
Jigsaw Guide for Beginners: What is it and How to Use It?
Have you ever needed to cut a curve in a piece of wood or make a hole right in the middle of a board? Maybe you are working on a DIY furniture project, cutting a countertop, or shaping some decorative pieces for your home. Whatever the project is, a jigsaw is the tool that makes all of that possible.
If you have never used one before, do not worry. The jigsaw is one of the safest and most beginner-friendly power tools available. It is lightweight, easy to hold, and gives you full control over where the blade goes.
Unlike bigger saws that only work in straight lines, you can steer a jigsaw around curves, corners, and complex shapes without a fixed workstation. Read on and you will know exactly how to set it up, pick the right blade, and make clean cuts from day one.
What is a Jigsaw?
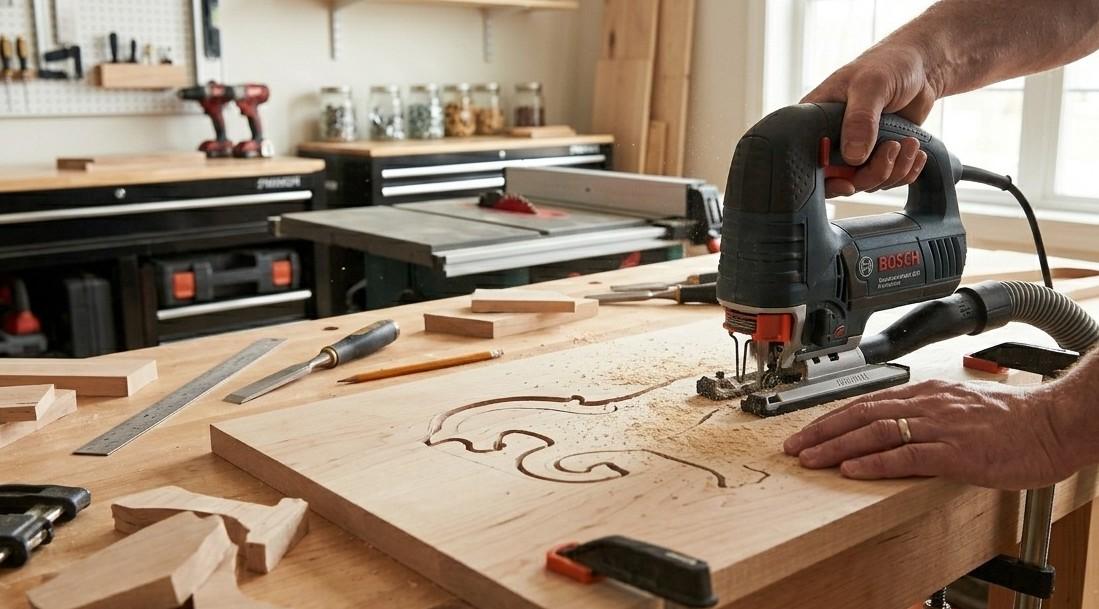
A jigsaw is a handheld reciprocating saw in which a motor drives a narrow blade in a rapid up-and-down motion to cut through material. Because the blade is thin and the tool is maneuverable, it excels at following curved lines and irregular shapes, tasks that table saws, circular saws, and miter saws struggle with.
Depending on the blade installed, a jigsaw can cut through wood, plywood, sheet metal, laminate, plastic, PVC pipe, and ceramic tile. That combination of portability and material versatility makes it one of the most useful first tools for any DIYer or woodworker.
Types of Jigsaws
Two main configurations exist. Top-handle jigsaws are the most common type, with the handle sitting above the motor and giving a slim, easy-to-control grip. The trade-off is that the handle sits further from the workpiece, which can make it harder to see tight cut lines. Barrel grip jigsaws wrap around the motor housing, positioning your body closer to the cut for a clearer sightline.
The grip is thicker and typically requires two hands to operate. For most beginners, a top-handle jigsaw is the easier starting point. Either type, corded or cordless, operates on the same basic principles.
Key Parts of a Jigsaw
Understanding the main components helps you set the tool up correctly and use it safely.
- Blade — determines the quality and type of cut
- Shoe (base plate) — the flat metal base that rests on the workpiece; can be tilted for bevel cuts
- Trigger and trigger lock — starts the blade; the lock holds it on for long cuts
- Speed control dial — adjusts how fast the blade reciprocates
- Orbital action switch — moves the blade in a forward arc for faster but rougher cuts; never use on metal or hardwoods
- Blade clamp — secures the blade; most modern jigsaws use a tool-free quick-release version
Choosing the Right Jigsaw Blade
Blade selection is the single biggest factor in the quality of your cut. Using the wrong blade leads to splintering, slow cutting, overheating, and poor results.
Teeth Per Inch
TPI stands for teeth per inch and determines how fast and how smooth the blade cuts. Low TPI between 6 and 10 cuts quickly but leaves a rough edge, best for fast cuts in thick wood.
Medium TPI between 10 and 20 works well for general-purpose cutting in most wood types. High TPI above 20 cuts slowly but leaves a fine, clean edge and is necessary for metal, laminate, and finish-quality work.
Blade Material
- High-carbon steel — flexible and affordable; suited for wood and plastic
- High-speed steel — handles heat well; cuts a variety of metals
- Bi-metal — combines flexibility with hardness; strong enough for fiberglass and stainless steel
- Tungsten carbide — the most durable option; used specifically for ceramic tile
Blade Width and Tooth Direction
- Wide blades track straighter and are better for long straight cuts
- Narrow blades pivot more easily and are the right choice for curves and circles
- Standard upward-cutting blades keep the bottom face clean but can splinter the top surface
- Reverse-tooth blades cut on the downstroke and produce a clean top surface
- Top-and-bottom cut blades have teeth in both directions and are the best option for clean edges on both faces
T-shank blades are the current industry standard and click into the tool without any wrench. U-shank blades are an older format found on some legacy tools and require a wrench for installation.
How to Change a Jigsaw Blade Safely
Always unplug the jigsaw or remove the battery before touching the blade. Release the old blade using the clamp or quick-release mechanism, then insert the new blade with teeth facing forward and confirm it is locked securely.
Run the jigsaw briefly without cutting to verify the blade is seated correctly, and allow a used blade to cool before handling or storing it.
Setting Up Before You Cut
Good preparation before cutting saves time and prevents mistakes.
- Mark your cut line clearly with a pencil and a straightedge or template
- On plywood or laminate, apply painter’s tape along the cut line to reduce splintering
- Clamp the workpiece firmly to a workbench so it does not shift during the cut
- Ensure the cut area overhangs the bench edge so the blade has clearance underneath
- Wear safety glasses, hearing protection, and a dust mask before starting
How to Use a Jigsaw Step by Step
Position the shoe flat on the workpiece with the blade just off the edge and not yet touching the material. Squeeze the trigger and allow the blade to reach full speed before advancing into the cut.
Feed the blade with gentle, even forward pressure and let it do the work. Forcing it causes deflection, rough cuts, and premature blade wear. Keep your eyes slightly ahead of the blade so you are steering toward where it is going rather than watching where it already is.
Maintain firm contact between the shoe and the workpiece throughout. When the cut is complete, release the trigger and wait for the blade to stop fully before setting the tool down.
Making Different Types of Cuts
A jigsaw’s versatility comes from its ability to perform a wide range of cuts, from straight lines and smooth curves to interior cutouts and angled bevels, making it suitable for both basic and advanced woodworking tasks.
Straight Cuts
Clamp a straight edge or a piece of scrap wood parallel to your cut line at the correct offset from the blade to the edge of the shoe. The shoe rides against this guide as you cut, keeping the line true. Use a faster speed setting and keep orbital action off for cleaner results.
Curve Cuts
Pick a blade width appropriate to how tight the curve is, narrower for tighter turns. For very sharp curves, make relief cuts first. These are short straight cuts running from outside the shape toward the curve at regular intervals to remove excess material, which prevents the blade from binding and allows the saw to pivot freely.
Plunge Cuts and Interior Cutouts
When you need to cut a shape from the middle of a panel, such as a sink cutout or cable access point, you cannot start from the edge. Drill a starter hole inside the cut area using a drill bit wider than the blade, insert the blade into the hole with the tool off, position the shoe flat, and begin cutting from inside the hole toward your marked line.
Bevel Cuts
The shoe on most jigsaws tilts to allow angled cuts up to 45 degrees. Loosen the bevel adjustment, set the angle using the scale on the tool or verify it against a protractor, and lock it back down before cutting. Use a slower speed when cutting at an angle since the blade is working through more material thickness.
Cutting Different Materials with a Jigsaw
| Material | Blade Type | Key Tips |
|---|---|---|
| Wood and Plywood | Medium TPI | Apply painter’s tape; cut finished face down |
| Metal | High TPI Bi-metal | Turn off orbital action; apply cutting oil |
| Sheet Metal | High TPI Bi-metal | Sandwich between scrap plywood to stop vibrating |
| Laminate and Countertops | Reverse-tooth | Cut from the back side to protect the visible face |
| Ceramic Tile | Tungsten Carbide | Cut slowly; apply water occasionally to manage heat |
Expert Tips for Perfect Cuts
Apply painter’s tape along the cut line on any material to prevent splintering, not just plywood. Keep a firm grip throughout to reduce blade deflection in thicker stock. When cutting the same shape multiple times, make a template from thin plywood or MDF and clamp it to each new workpiece for consistent results.
Use lower speeds for detailed work where control matters most, and higher speeds for rough cuts where finish quality is not the priority. Replace blades regularly since a dull blade forces you to push harder, which causes drift and poor results.
Using Cutting Guides and Templates
For long straight cuts, clamp a straight guide to the workpiece at the correct offset from the blade to the outer edge of the shoe. The shoe tracks against this guide throughout the cut, keeping the line accurate without needing to freehand.
For curves and irregular shapes, attach a printed or hand-drawn template directly to the workpiece. Templates are especially useful when cutting multiple identical pieces for a project and eliminate guesswork on repeated shapes.
Safety Tips for Using a Jigsaw
- Always unplug the tool or remove the battery before changing blades or making any adjustments
- Never place fingers underneath the workpiece since the blade extends below the shoe during operation
- Keep the workpiece clamped at all times and never start the blade while it is in contact with the material
- If the blade jams, release the trigger immediately, wait for it to stop, then back the tool out
- Keep the power cord behind you and away from the blade path at all times
- Store the tool unplugged in a dry location
Common Mistakes to Avoid
Using the wrong blade is the most common reason for poor results, so always match the blade to the material. Forcing the saw bends the blade, causes it to drift from the cut line, and accelerates wear on both the blade and the tool.
Not securing the workpiece creates a safety hazard and makes a clean cut impossible. Always begin with the blade clear of the surface to avoid kickback, and replace worn blades before they cause deflection or rough edges.
Conclusion
The jigsaw rewards patience and practice. Once you understand how blade selection, speed settings, and guiding technique work together, it becomes one of the most capable tools in any workshop. Start with simple cuts, build confidence with the basics, and gradually take on more complex shapes as your technique develops.
When you are ready to source equipment or replace worn blades, connect with Power Blitzz customer service to get quotations from a reliable supplier across industrial and construction sectors. You can also browse the full range at Power Blitzz for quality equipment and dependable service.
Keep Reading More Guides
- CFM vs. PSI Air Pressure: What You Need To Know: Understand the difference between CFM and PSI air pressure.
- How UAE Weather Affects Air Compressor Performance: Impact of heat, dust, and humidity.
- Top Applications of Air Compressors in UAE Construction: Where compressors are used on-site.
- Best Air Compressor for Spray Painting in UAE Workshops: Best picks for smooth finishing.
- 7 Benefits of Silent Air Compressor in the Workplace: Why quiet compressors matter

Popular Posts
November 8, 2023
November 14, 2023
November 28, 2023
December 4, 2023
December 13, 2023
Copyright © 2024 – Power Blitzz– All rights reserved.